RESTful APIs with CRUD Operations in Laravel 12| (2025)
RESTful APIs serve as the foundation of modern web development. They follow a set of rules called Representational State Transfer (REST) to make sure web services work smoothly together. Think of it as possessing a universal language that all systems comprehend, facilitating smoother and more dependable communication across the internet.

Let’s illustrate the concepts of RESTful APIs with a practical example of a Customer CRUD (Create, Read, Update, Delete) operations using Laravel.
1. Create a Laravel Project
First, create a new Laravel project using Composer:
composer create-project --prefer-dist laravel/laravel customer-api2. Create API File in Routes
To define the routes for your API, Laravel 11 provides a convenient command to generate the api.php file in the routes folder. You can use the following command:
php artisan install:apiThis command will create the api.php file in the routes folder if it doesn't already exist. The api.php file is where you can define your API routes.
3. Configure Database Connection
Now you need to configure the database connection. By default, Laravel 11 uses SQLite for its database connection. However, if you prefer to use MySQL or another database, you need to update the database configuration.
Open the .env file located in the root directory of your Laravel 11 project. Update the database configuration as follows:
DB_CONNECTION=mysql
DB_HOST=127.0.0.1
DB_PORT=3306
DB_DATABASE=customer_api
DB_USERNAME=root
DB_PASSWORD=
Now you have created a database named customer_api in your MySQL server before running the Laravel migrations. You can create the customer_api database using a MySQL client, command-line interface, or phpMyAdmin.
4. Create Model and Migration
Generate a Customer model and migration:
php artisan make:model Customer -mDefine the schema for the customers table in the migration file and run the migration to create the table.
Get Shailly Dixit’s stories in your inbox
Join Medium for free to get updates from this writer.
Migration file (database/migrations/[timestamp]_create_customers_table.php):
<?php

use Illuminate\Database\Migrations\Migration;
use Illuminate\Database\Schema\Blueprint;
use Illuminate\Support\Facades\Schema;

return new class extends Migration
{
    /**
     * Run the migrations.
     */
    public function up(): void
    {
        Schema::create('customers', function (Blueprint $table) {
            $table->id();
            $table->string('name');
            $table->string('email')->unique();
            $table->timestamps();
        });
    }

    /**
     * Reverse the migrations.
     */
    public function down(): void
    {
        Schema::dropIfExists('customers');
    }
};
Run the migration:
php artisan migrateOpen the Customer.php file located in the app/Models directory. Add the fillable property to specify which attributes can be mass-assigned:
<?php

namespace App\Models;

use Illuminate\Database\Eloquent\Factories\HasFactory;
use Illuminate\Database\Eloquent\Model;

class Customer extends Model
{
    use HasFactory;

    protected $fillable = [
        'name',
        'email',
    ];
}
In the fillable array, specify the attributes that you want to allow mass assignment for. These are the attributes that you can pass directly to the create method of the Customer model or use in mass updates using the update method.
5. Create Customer Controller
Generate a controller for managing customers:
php artisan make:controller CustomerControllerImplement CRUD operations in the CustomerController using Laravel's Eloquent ORM.
CustomerController (app/Http/Controllers/CustomerController.php):
<?php

namespace App\Http\Controllers;

use App\Models\Customer;
use Illuminate\Http\Request;
use Illuminate\Support\Facades\Validator;

class CustomerController extends Controller
{
    public function index()
    {
        $customers = Customer::all();
        return response()->json([
            'status' => true,
            'message' => 'Customers retrieved successfully',
            'data' => $customers
        ], 200);
    }

    public function show($id)
    {
        $customer = Customer::findOrFail($id);
        return response()->json([
            'status' => true,
            'message' => 'Customer found successfully',
            'data' => $customer
        ], 200);
    }

    public function store(Request $request)
    {
        $validator = Validator::make($request->all(), [
            'name' => 'required|string|max:255',
            'email' => 'required|string|email|unique:customers|max:255',
        ]);

        if ($validator->fails()) {
            return response()->json([
                'status' => false,
                'message' => 'Validation error',
                'errors' => $validator->errors()
            ], 422);
        }

        $customer = Customer::create($request->all());
        return response()->json([
            'status' => true,
            'message' => 'Customer created successfully',
            'data' => $customer
        ], 201);
    }

    public function update(Request $request, $id)
    {
        $validator = Validator::make($request->all(), [
            'name' => 'required|string|max:255',
            'email' => 'required|string|email|max:255|unique:customers,email,' . $id,
        ]);

        if ($validator->fails()) {
            return response()->json([
                'status' => false,
                'message' => 'Validation error',
                'errors' => $validator->errors()
            ], 422);
        }

        $customer = Customer::findOrFail($id);
        $customer->update($request->all());

        return response()->json([
            'status' => true,
            'message' => 'Customer updated successfully',
            'data' => $customer
        ], 200);
    }

    public function destroy($id)
    {
        $customer = Customer::findOrFail($id);
        $customer->delete();

        return response()->json([
            'status' => true,
            'message' => 'Customer deleted successfully'
        ], 204);
    }
}
6. Define Routes
Define the routes for the API in routes/api.php.
<?php

use Illuminate\Http\Request;
use Illuminate\Support\Facades\Route;


Route::get('/customers', [CustomerController::class, 'index']);
Route::get('/customers/{id}', [CustomerController::class, 'show']);
Route::post('/customers', [CustomerController::class, 'store']);
Route::put('/customers/{id}', [CustomerController::class, 'update']);
Route::delete('/customers/{id}', [CustomerController::class, 'destroy']);
7. Test the API
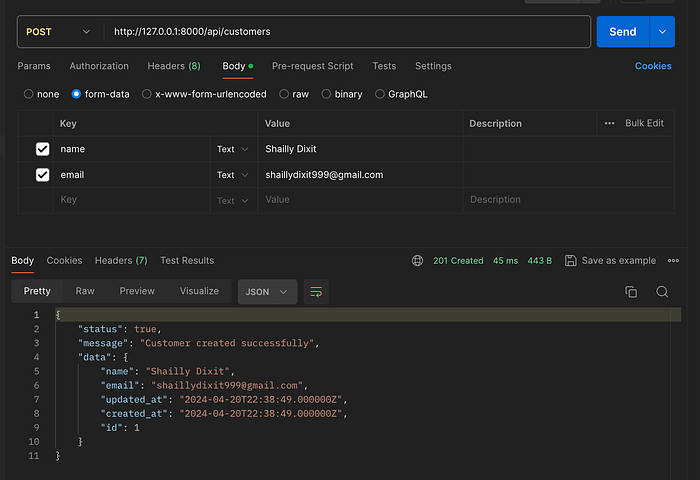
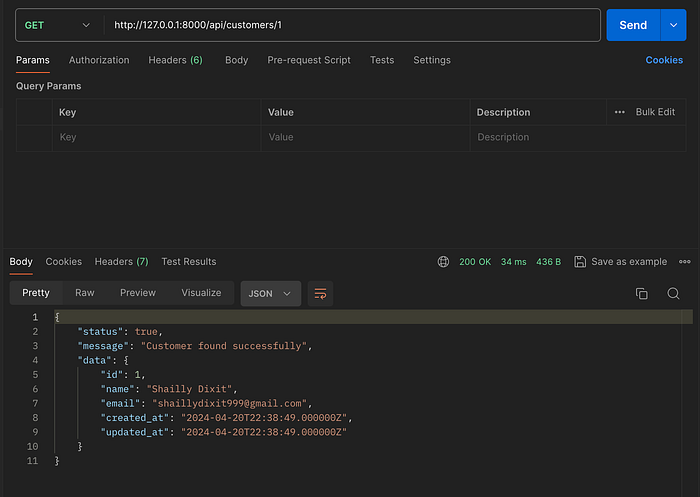
After setting up your Laravel project and defining the CRUD operations for the Customer API, it’s essential to test the endpoints to ensure they function correctly. Tools like Postman provide a user-friendly interface for sending requests to your API endpoints and inspecting the responses.


Using Postman, you can simulate various HTTP requests such as GET, POST, PUT, DELETE, etc., and examine the JSON responses returned by your API.


No comments